1. Getting started with Infinispan server
1.1. Infinispan Server
Infinispan Server is a standalone server which exposes any number of caches to clients over a variety of protocols, including HotRod, Memcached and REST.
The server itself is built on top of the robust foundation provided by WildFly, therefore delegating services such as management, configuration, datasources, transactions, logging, security to the respective subsystems.
Because Infinispan Server is closely tied to the latest releases of Infinispan and JGroups, the subsystems which control these components are different, in that they introduce new features and change some existing ones (e.g. cross-site replication, etc).
For this reason, the configuration of these subsystems should use the Infinispan Server-specific schema, although for most use-cases the configuration is interchangeable.
1.2. Downloading the Server Distribution
To get started using the server, download the Infinispan Server distribution, unpack it to a local directory and launch it using the bin/standalone.sh or bin/standalone.bat scripts depending on your platform. This will start a single-node server using the standalone/configuration/standalone.xml configuration file, with four endpoints, one for each of the supported protocols. These endpoints allow access to all of the caches configured in the Infinispan subsystem (apart from the Memcached endpoint which, because of the protocol’s design, only allows access to a single cache).
ifndef::parent-context[:!context:
2. Operating modes
Infinispan Server provides two different operating modes: standalone and domain.
2.1. Standalone mode
For simple configurations, standalone mode is the easiest to start with. It allows both local and clustered configurations, although we only really recommend it for running single nodes, since the configuration, management and coordination of multiple nodes is up to the user’s responsibility. For example, adding a cache to a cluster of standalone server, the user would need to configure individually to all nodes. Note that the default standalone.xml configuration does not provide a JGroups subsystem and therefore cannot work in clustered mode. To start standalone mode with an alternative configuration file, use the -c command-line switch as follows:
bin/standalone.sh -c clustered.xml
If you start the server in clustered mode on multiple hosts, they should automatically discover each other using UDP multicast and form a cluster. If you want to start multiple nodes on a single host, start each one by specifying a port offset using the jboss.socket.binding.port-offset property together with a unique jboss.node.name as follows:
bin/standalone.sh -Djboss.socket.binding.port-offset=100 -Djboss.node.name=nodeA
If, for some reason, you cannot use UDP multicast, you can use TCP discovery. Read the JGroups Subsystem Configuration section below for details on how to configure TCP discovery.
2.2. Domain mode
Domain mode is the recommended way to run a cluster of servers, since they can all be managed centrally from a single control point. The following diagram explains the topology of an example domain configuration, with 4 server nodes (A1, A2, B1, B2) running on two physical hosts (A, B):

- Hosts
-
Each "Host" box in the above diagram represents a physical or virtual host. A physical host can contain zero, one or more server instances.
2.2.1. Host Controller
When the domain.sh or domain.bat script is run on a host, a process known as a Host Controller is launched. The Host Controller is solely concerned with server management; it does not itself handle Infinispan server workloads. The Host Controller is responsible for starting and stopping the individual Infinispan server processes that run on its host, and interacts with the Domain Controller to help manage them.
Each Host Controller by default reads its configuration from the domain/configuration/host.xml file located in the Infinispan Server installation on its host’s filesystem. The host.xml file contains configuration information that is specific to the particular host. Primarily:
-
the listing of the names of the actual Infinispan Server instances that are meant to run off of this installation.
-
configuration of how the Host Controller is to contact the Domain Controller to register itself and access the domain configuration. This may either be configuration of how to find and contact a remote Domain Controller, or a configuration telling the Host Controller to itself act as the Domain Controller.
-
configuration of items that are specific to the local physical installation. For example, named interface definitions declared in domain.xml (see below) can be mapped to an actual machine-specific IP address in host.xml. Abstract path names in domain.xml can be mapped to actual filesystem paths in host.xml.
2.2.2. Domain Controller
One Host Controller instance is configured to act as the central management point for the entire domain, i.e. to be the Domain Controller. The primary responsibility of the Domain Controller is to maintain the domain’s central management policy, to ensure all Host Controllers are aware of its current contents, and to assist the Host Controllers in ensuring any running Infinispan server instances are configured in accordance with this policy. This central management policy is stored by default in the domain/configuration/domain.xml file in the Infinispan Server installation on Domain Controller’s host’s filesystem.
A domain.xml file must be located in the domain/configuration directory of an installation that’s meant to run the Domain Controller. It does not need to be present in installations that are not meant to run a Domain Controller; i.e. those whose Host Controller is configured to contact a remote Domain Controller. The presence of a domain.xml file on such a server does no harm.
The domain.xml file includes, among other things, the configuration of the various "profiles" that Infinispan Server instances in the domain can be configured to run. A profile configuration includes the detailed configuration of the various subsystems that comprise that profile (e.g. Cache Containers and Caches, Endpoints, Security Realms, DataSources, etc). The domain configuration also includes the definition of groups of sockets that those subsystems may open. The domain configuration also includes the definition of "server groups".
2.3. Server Group
A server group is set of server instances that will be managed and configured as one. In a managed domain each application server instance is a member of a server group. Even if the group only has a single server, the server is still a member of a group. It is the responsibility of the Domain Controller and the Host Controllers to ensure that all servers in a server group have a consistent configuration. They should all be configured with the same profile and they should have the same deployment content deployed. To keep things simple, ensure that all the nodes that you want to belong to an Infinispan cluster are configured as servers of one server group.
The domain can have multiple server groups, i.e. multiple Infinispan clusters. Different server groups can be configured with different profiles and deployments; for example in a domain with different Infinispan Server clusters providing different services. Different server groups can also run the same profile and have the same deployments.
An example server group definition is as follows:
<server-group name="main-server-group" profile="clustered">
    <socket-binding-group ref="standard-sockets"/>
</server-group>
2.3.1. Server group configuration
A server-group configuration includes the following required attributes:
-
name — the name of the server group
-
profile — the name of the profile the servers in the group should run
In addition, the following optional elements are available:
-
socket-binding-group — specifies the name of the default socket binding group to use on servers in the group. Can be overridden on a per-server basis in host.xml. If not provided in the server-group element, it must be provided for each server in host.xml.
-
deployments — the deployment content that should be deployed on the servers in the group.
-
system-properties — system properties that should be set on all servers in the group
-
jvm — default jvm settings for all servers in the group. The Host Controller will merge these settings with any provided in host.xml to derive the settings to use to launch the server’s JVM. See JVM settings for further details.
2.4. Server nodes
Each "Server" in the above diagram represents an actual Infinispan Server node. The server runs in a separate JVM process from the Host Controller. The Host Controller is responsible for launching that process. In a managed domain the end user cannot directly launch a server process from the command line.
The Host Controller synthesizes the server’s configuration by combining elements from the domain wide configuration (from domain.xml) and the host-specific configuration (from host.xml).
2.4.1. Example configurations
The server distribution also provides a set of example configuration files in the docs/examples/configs (mostly using standalone mode) which illustrate a variety of possible configurations and use-cases. To use them, just copy them to the standalone/configuration directory and start the server using the following syntax:
bin/standalone.sh -c configuration_file_name.xml
3. Configuring Infinispan Servers
3.1. JGroups Subsystem Configuration
The JGroups subsystem configures the network transport and is only required when clustering multiple Infinispan Server nodes together.
The subsystem declaration is enclosed in the following XML element:
<subsystem xmlns="urn:infinispan:server:jgroups:9.2">
  <channels default="cluster">
    <channel name="cluster"/>
  </channels>
  <stacks default="${jboss.default.jgroups.stack:udp}">
    ...
  </stacks>
</subsystem>
Within the subsystem, you need to declare the stacks that you wish to use and name them. The default-stack attribute in the subsystem declaration must point to one of the declared stacks.
3.1.1. Switching JGroups Stacks
You can switch stacks from the command-line using the jboss.default.jgroups.stack property:
bin/standalone.sh -c clustered.xml -Djboss.default.jgroups.stack=tcp
3.1.2. Tuning Transport Protocols
A stack declaration is composed of a transport, UDP or TCP, followed by a list of protocols. You can tune protocols by adding properties as child elements with this format:
<property name="prop_name">prop_value</property>
3.1.3. Default JGroups Stacks
Default stacks for Infinispan are as follows:
<stack name="udp">
  <transport type="UDP" socket-binding="jgroups-udp"/>
  <protocol type="PING"/>
  <protocol type="MERGE3"/>
  <protocol type="FD_SOCK" socket-binding="jgroups-udp-fd"/>
  <protocol type="FD_ALL"/>
  <protocol type="VERIFY_SUSPECT"/>
  <protocol type="pbcast.NAKACK2"/>
  <protocol type="UNICAST3"/>
  <protocol type="pbcast.STABLE"/>
  <protocol type="pbcast.GMS"/>
  <protocol type="UFC_NB"/>
  <protocol type="MFC_NB"/>
  <protocol type="FRAG3"/>
</stack>
<stack name="tcp">
  <transport type="TCP" socket-binding="jgroups-tcp"/>
  <protocol type="MPING" socket-binding="jgroups-mping"/>
  <protocol type="MERGE3"/>
  <protocol type="FD_SOCK" socket-binding="jgroups-tcp-fd"/>
  <protocol type="FD_ALL"/>
  <protocol type="VERIFY_SUSPECT"/>
  <protocol type="pbcast.NAKACK2">
    <property name="use_mcast_xmit">false</property>
  </protocol>
  <protocol type="UNICAST3"/>
  <protocol type="pbcast.STABLE"/>
  <protocol type="pbcast.GMS"/>
  <protocol type="MFC_NB"/>
  <protocol type="FRAG3"/>
</stack>|
For some properties, Infinispan uses values other than the JGroups defaults to tune performance. You should examine the following files to review the JGroups configuration for Infinispan:
See JGroups Protocol documentation for more information about available properties and default values. |
The default TCP stack uses the MPING protocol for discovery, which uses UDP multicast. If you need to use a different protocol, look at the JGroups Discovery Protocols .
3.1.4. TCP PING Discovery
The following example stack configures the TCPPING discovery protocol with two initial hosts:
<stack name="tcp">
  <transport type="TCP" socket-binding="jgroups-tcp"/>
  <protocol type="TCPPING">
    <property name="initial_hosts">HostA[7800],HostB[7800]</property>
  </protocol>
  <protocol type="MERGE3"/>
  <protocol type="FD_SOCK" socket-binding="jgroups-tcp-fd"/>
  <protocol type="FD_ALL"/>
  <protocol type="VERIFY_SUSPECT"/>
  <protocol type="pbcast.NAKACK2">
    <property name="use_mcast_xmit">false</property>
  </protocol>
  <protocol type="UNICAST3"/>
  <protocol type="pbcast.STABLE"/>
  <protocol type="pbcast.GMS"/>
  <protocol type="UFC_NB"/>
  <protocol type="MFC_NB"/>
  <protocol type="FRAG3"/>
</stack>
3.1.5. TCP Gossip Discovery
The default configurations come with a variety of pre-configured stacks for different environments. For example, the tcpgossip stack uses Gossip discovery:
<protocol type="TCPGOSSIP">
  <property name="initial_hosts">${jgroups.gossip.initial_hosts:}</property>
</protocol>
3.1.6. AWS S3 Ping
Use the s3 stack when running in Amazon AWS:
<protocol type="org.jgroups.aws.s3.NATIVE_S3_PING" module="org.jgroups.aws.s3:ispn-10.0">
  <property name="region_name">${jgroups.s3.region:}</property>
  <property name="bucket_name">${jgroups.s3.bucket_name:}</property>
  <property name="bucket_prefix">${jgroups.s3.bucket_prefix:}</property>
</protocol>
3.1.7. Google Ping
Similarly, when using Google’s Cloud Platform, use the google stack:
<protocol type="GOOGLE_PING">
  <property name="location">${jgroups.google.bucket:}</property>
  <property name="access_key">${jgroups.google.access_key:}</property>
  <property name="secret_access_key">${jgroups.google.secret_access_key:}</property>
</protocol>
3.1.8. DNS Ping
Use the dns-ping stack to run Infinispan on Kubernetes environments such as OKD or OpenShift:
<protocol type="dns.DNS_PING">
    <property name="dns_query">${jgroups.dns_ping.dns_query}</property>
</protocol>
The value of the dns_query property is the DNS query that returns the cluster members. See DNS for Services and Pods for information about Kubernetes DNS naming.
3.2. Infinispan subsystem
The Infinispan subsystem configures the cache containers and caches.
The subsystem declaration is enclosed in the following XML element:
<subsystem xmlns="urn:infinispan:server:core:9.4" default-cache-container="clustered">
  ...
</subsystem>
3.2.1. Containers
The Infinispan subsystem can declare multiple containers. A container is declared as follows:
<cache-container name="clustered" default-cache="default">
  ...
</cache-container>
Note that in server mode is the lack of an implicit default cache, but the ability to specify a named cache as the default.
If you need to declare clustered caches (distributed, replicated, invalidation), you also need to specify the <transport/> element which references an existing JGroups transport. This is not needed if you only intend to have local caches only.
<transport executor="infinispan-transport" lock-timeout="60000" stack="udp" cluster="my-cluster-name"/>3.2.2. Cache declarations
Now you can declare your caches. Please be aware that only the caches declared in the configuration will be available to the endpoints and that attempting to access an undefined cache is an illegal operation. Contrast this with the default Infinispan library behaviour where obtaining an undefined cache will implicitly create one using the default settings. The following are example declarations for all four available types of caches:
<local-cache name="default" start="EAGER">
  ...
</local-cache>

<replicated-cache name="replcache" mode="SYNC" remote-timeout="30000" start="EAGER">
  ...
</replicated-cache>

<invalidation-cache name="invcache" mode="SYNC" remote-timeout="30000" start="EAGER">
  ...
</invalidation-cache>

<distributed-cache name="distcache" mode="SYNC" segments="20" owners="2" remote-timeout="30000" start="EAGER">
  ...
</distributed-cache>
3.2.3. Expiration
To define a default expiration for entries in a cache, add the <expiration/> element as follows:
<expiration lifespan="2000" max-idle="1000"/>The possible attributes for the expiration element are:
-
lifespan maximum lifespan of a cache entry, after which the entry is expired cluster-wide, in milliseconds. -1 means the entries never expire.
-
max-idle maximum idle time a cache entry will be maintained in the cache, in milliseconds. If the idle time is exceeded, the entry will be expired cluster-wide. -1 means the entries never expire.
-
interval interval (in milliseconds) between subsequent runs to purge expired entries from memory and any cache stores. If you wish to disable the periodic eviction process altogether, set interval to -1.
3.2.4. Eviction
To define eviction for a cache, add the <memory/> element as follows:
<memory>
  <binary size="1000" eviction="COUNT"/>
</memory>
The possible attributes for the eviction element are:
-
strategy sets the cache eviction strategy. Available options are 'UNORDERED', 'FIFO', 'LRU', 'LIRS' and 'NONE' (to disable eviction).
-
max-entries maximum number of entries in a cache instance. If selected value is not a power of two the actual value will default to the least power of two larger than selected value. -1 means no limit.
3.2.5. Locking
To define the locking configuration for a cache, add the <locking/> element as follows:
<locking isolation="REPEATABLE_READ" acquire-timeout="30000" concurrency-level="1000" striping="false"/>The possible attributes for the locking element are:
-
isolation sets the cache locking isolation level. Can be NONE, READ_UNCOMMITTED, READ_COMMITTED, REPEATABLE_READ, SERIALIZABLE. Defaults to REPEATABLE_READ
-
striping if true, a pool of shared locks is maintained for all entries that need to be locked. Otherwise, a lock is created per entry in the cache. Lock striping helps control memory footprint but may reduce concurrency in the system.
-
acquire-timeout maximum time to attempt a particular lock acquisition.
-
concurrency-level concurrency level for lock containers. Adjust this value according to the number of concurrent threads interacting with Infinispan.
-
concurrent-updates for non-transactional caches only: if set to true(default value) the cache keeps data consistent in the case of concurrent updates. For clustered caches this comes at the cost of an additional RPC, so if you don’t expect your application to write data concurrently, disabling this flag increases performance.
3.2.6. Loaders and Stores
Loaders and stores can be defined in server mode in almost the same way as in embedded mode.
However, in server mode it is no longer necessary to define the <persistence>…</persistence> tag. Instead, a store’s attributes are
now defined on the store type element. For example, to configure the H2 database with a distributed cache in domain mode
we define the "default" cache as follows in our domain.xml configuration:
<subsystem xmlns="urn:infinispan:server:core:9.4">
  <cache-container name="clustered" default-cache="default" statistics="true">
    <transport lock-timeout="60000"/>
    <global-state/>
    <distributed-cache name="default">
      <string-keyed-jdbc-store datasource="java:jboss/datasources/ExampleDS" fetch-state="true" shared="true">
        <string-keyed-table prefix="ISPN">
          <id-column name="id" type="VARCHAR"/>
          <data-column name="datum" type="BINARY"/>
          <timestamp-column name="version" type="BIGINT"/>
        </string-keyed-table>
        <write-behind modification-queue-size="20"/>
      </string-keyed-jdbc-store>
    </distributed-cache>
  </cache-container>
</subsystem>
Another important thing to note in this example, is that we use the "ExampleDS" datasource which is defined in the datasources subsystem in our domain.xml configuration as follows:
<subsystem xmlns="urn:jboss:domain:datasources:4.0">
  <datasources>
    <datasource jndi-name="java:jboss/datasources/ExampleDS" pool-name="ExampleDS" enabled="true" use-java-context="true">
      <connection-url>jdbc:h2:mem:test;DB_CLOSE_DELAY=-1;DB_CLOSE_ON_EXIT=FALSE</connection-url>
      <driver>h2</driver>
      <security>
        <user-name>sa</user-name>
        <password>sa</password>
      </security>
    </datasource>
  </datasources>
</subsystem>
For additional examples of store configurations, please view the configuration templates in the default "domain.xml" file
provided with in the server distribution at ./domain/configuration/domain.xml.
|
3.2.7. State Transfer
To define the state transfer configuration for a distributed or replicated cache, add the <state-transfer/> element as follows:
<state-transfer enabled="true" timeout="240000" chunk-size="512" await-initial-transfer="true" />The possible attributes for the state-transfer element are:
-
enabled if true, this will cause the cache to ask neighboring caches for state when it starts up, so the cache starts 'warm', although it will impact startup time. Defaults to true.
-
timeout the maximum amount of time (ms) to wait for state from neighboring caches, before throwing an exception and aborting startup. Defaults to 240000 (4 minutes).
-
chunk-size the number of cache entries to batch in each transfer. Defaults to 512.
-
await-initial-transfer if true, this will cause the cache to wait for initial state transfer to complete before responding to requests. Defaults to true.
3.3. Endpoint subsystem configuration
The endpoint subsystem exposes a whole container (or in the case of Memcached, a single cache) over a specific connector protocol. You can define as many connector as you need, provided they bind on different interfaces/ports.
The subsystem declaration is enclosed in the following XML element:
<subsystem xmlns="urn:infinispan:server:endpoint:9.4">
 ...
</subsystem>
3.3.1. Hot Rod
The following connector declaration enables a HotRod server using the hotrod socket binding (declared within a <socket-binding-group /> element) and exposing the caches declared in the local container, using defaults for all other settings.
<hotrod-connector socket-binding="hotrod" cache-container="local" />The connector will create a supporting topology cache with default settings. If you wish to tune these settings add the <topology-state-transfer /> child element to the connector as follows:
<hotrod-connector socket-binding="hotrod" cache-container="local">
   <topology-state-transfer lazy-retrieval="false" lock-timeout="1000" replication-timeout="5000" />
</hotrod-connector>
The Hot Rod connector can be further tuned with additional settings such as concurrency and buffering. See the protocol connector settings paragraph for additional details
Furthermore the HotRod connector can be secured using SSL. First you need to declare an SSL server identity within a security realm in the management section of the configuration file. The SSL server identity should specify the path to a keystore and its secret. Refer to the AS documentation on this. Next add the <security /> element to the HotRod connector as follows:
<hotrod-connector socket-binding="hotrod" cache-container="local">
    <security ssl="true" security-realm="ApplicationRealm" require-ssl-client-auth="false" />
</hotrod-connector>
3.3.2. Memcached
The following connector declaration enables a Memcached server using the memcached socket binding (declared within a <socket-binding-group /> element) and exposing the memcachedCache cache declared in the local container, using defaults for all other settings. Because of limitations in the Memcached protocol, only one cache can be exposed by a connector. If you wish to expose more than one cache, declare additional memcached-connectors on different socket-bindings.
<memcached-connector socket-binding="memcached" cache-container="local"/>3.3.3. REST
<rest-connector socket-binding="rest" cache-container="local" security-domain="other" auth-method="BASIC"/>3.3.4. Common Protocol Connector Settings
The HotRod and Memcached protocol connectors support a number of tuning attributes in their declaration:
-
worker-threads Sets the number of worker threads. Defaults to 160.
-
idle-timeout Specifies the maximum time in seconds that connections from client will be kept open without activity. Defaults to -1 (connections will never timeout)
-
tcp-nodelay Affects TCP NODELAY on the TCP stack. Defaults to enabled.
-
send-buffer-size Sets the size of the send buffer.
-
receive-buffer-size Sets the size of the receive buffer.
3.4. Protocol Interoperability
Clients exchange data with Infinispan through endpoints such as REST or Hot Rod.
Each endpoint uses a different protocol so that clients can read and write data in a suitable format. Because Infinispan can interoperate with multiple clients at the same time, it must convert data between client formats and the storage formats.
3.5. Custom Marshaller Bridges
Infinispan provides two marshalling bridges for marshalling client/server requests using the Kryo and Protostuff libraries. To utilise either of these marshallers, you simply place the dependency of the marshaller you require in your client pom. Custom schemas for object marshalling must then be registered with the selected library using the library’s api on the client or by implementing a RegistryService for the given marshaller bridge. Examples of how to achieve this for both libraries are presented below:
3.5.1. Protostuff
Add the protostuff marshaller dependency to your pom:
<dependency>
  <groupId>org.infinispan</groupId>
  <artifactId>infinispan-marshaller-protostuff</artifactId>
  <!-- Replace ${version.infinispan} with the
  version of Infinispan that you're using. -->
  <version>${version.infinispan}</version>
</dependency>
To register custom Protostuff schemas in your own code, you must register the custom schema with Protostuff before any marshalling begins. This can be achieved by simply calling:
RuntimeSchema.register(ExampleObject.class, new ExampleObjectSchema());Or, you can implement a service provider for the SchemaRegistryService.java interface, placing all Schema registrations
in the register() method. Implementations of this interface are loaded via Java’s ServiceLoader api, therefore the full path
of the implementing class(es) should be provided in a META-INF/services/org/infinispan/marshaller/protostuff/SchemaRegistryService
file within your deployment jar.
3.5.2. Kryo
Add the kryo marshaller dependency to your pom:
<dependency>
  <groupId>org.infinispan</groupId>
  <artifactId>infinispan-marshaller-kryo</artifactId>
  <!-- Replace ${version.infinispan} with the
  version of Infinispan that you're using. -->
  <version>${version.infinispan}</version>
</dependency>
To register custom Kryo serializer in your own code, you must register the custom serializer with Kryo before any
marshalling begins. This can be achieved by implementing a service provider for the SerializerRegistryService.java interface, placing all serializer registrations
in the register(Kryo) method; where serializers should be registered with the supplied Kryo object using the Kryo api.
e.g. kryo.register(ExampleObject.class, new ExampleObjectSerializer()). Implementations of this interface are loaded
via Java’s ServiceLoader api, therefore the full path of the implementing class(es) should be provided in a
META-INF/services/org/infinispan/marshaller/kryo/SerializerRegistryService file within your deployment jar.
3.5.3. Storing deserialized objects
When using the Protostuff/Kryo bridges in caches configured with application/x-java-object as MediaType (storing POJOs instead of binary content) it is necessary for the class files of all custom objects to be placed on the classpath of the server. To achieve this, you should place a jar containing all of their custom classes on the server’s classpath.
When utilising a custom marshaller, it is also necessary for the marshaller and it’s runtime dependencies to be on the server’s classpath. To aid with this step we have created a "bundle" jar for each of the bridge implementations which includes all of the runtime class files required by the bridge and underlying library. Therefore, it is only necessary to include this single jar on the server’s classpath.
Bundle jar downloads:
Jar files containing custom classes must be placed in the same module/directory as the custom marshaller bundle so
that the marshaller can load them. i.e. if you register the marshaller bundle in modules/system/layers/base/org/infinispan/main/modules.xml,
then you must also register your custom classes here.
|
3.5.4. Registering Custom Schemas/Serializers
Custom serializers/schemas for the Kryo/Protostuff marshallers must be registered via their respective service interfaces in order to store deserialized objects. To achieve this, it is necessary for a JAR that contains the service provider to be registered in the same directory or module as the marshaller bundle and custom classes.
|
It is not necessary for the service provider implementation to be provided in the same JAR as the user’s custom classes. However, the JAR that contains the provider must be in the same directory/module as the marshaller and custom class JAR files. |
4. Performing Rolling Upgrades
Upgrade Infinispan without downtime or data loss. You can perform rolling upgrades for Infinispan servers to start using a more recent version of Infinispan.
|
This section explains how to upgrade Infinispan servers, see the appropriate documentation for your Hot Rod client for upgrade procedures. |
4.1. Rolling Upgrades
From a high-level, you do the following to perform rolling upgrades:
-
Set up a target cluster. The target cluster is the Infinispan version to which you want to migrate data. The source cluster is the Infinispan deployment that is currently in use. After the target cluster is running, you configure all clients to point to it instead of the source cluster.
-
Synchronize data from the source cluster to the target cluster.
4.2. Setting Up Target Clusters
-
Start the target cluster with unique network properties or a different JGroups cluster name to keep it separate from the source cluster.
-
Configure a
RemoteCacheStoreon the target cluster for each cache you want to migrate from the source cluster.RemoteCacheStoresettings-
-
remote-servermust point to the source cluster via theoutbound-socket-bindingproperty. -
remoteCacheNamemust match the cache name on the source cluster. -
hotrod-wrappingmust betrue(enabled). -
sharedmust betrue(enabled). -
purgemust befalse(disabled). -
passivationmust befalse(disabled). -
protocol-versionmatches the Hot Rod protocol version of the source cluster.ExampleRemoteCacheStoreConfiguration<distributed-cache> <remote-store cache="MyCache" socket-timeout="60000" tcp-no-delay="true" protocol-version="2.5" shared="true" hotrod-wrapping="true" purge="false" passivation="false"> <remote-server outbound-socket-binding="remote-store-hotrod-server"/> </remote-store> </distributed-cache> ... <socket-binding-group name="standard-sockets" default-interface="public" port-offset="${jboss.socket.binding.port-offset:0}"> ... <outbound-socket-binding name="remote-store-hotrod-server"> <remote-destination host="198.51.100.0" port="11222"/> </outbound-socket-binding> ... </socket-binding-group>
-
-
Configure the target cluster to handle all client requests instead of the source cluster:
-
Configure all clients to point to the target cluster instead of the source cluster.
-
Restart each client node.
The target cluster lazily loads data from the source cluster on demand via
RemoteCacheStore.
-
4.3. Synchronizing Data from Source Clusters
-
Call the
synchronizeData()method in theTargetMigratorinterface. Do one of the following on the target cluster for each cache that you want to migrate:- JMX
-
Invoke the
synchronizeDataoperation and specify thehotrodparameter on theRollingUpgradeManagerMBean. - CLI
-
$ bin/ispn-cli.sh --connect controller=127.0.0.1:9990 -c "/subsystem=datagrid-infinispan/cache-container=clustered/distributed-cache=MyCache:synchronize-data(migrator-name=hotrod)"Data migrates to all nodes in the target cluster in parallel, with each node receiving a subset of the data.
Use the following parameters to tune the operation:
-
read-batchconfigures the number of entries to read from the source cluster at a time. The default value is10000. -
write-threadsconfigures the number of threads used to write data. The default value is the number of processors available.For example:
synchronize-data(migrator-name=hotrod, read-batch=100000, write-threads=3)
-
-
Disable the
RemoteCacheStoreon the target cluster. Do one of the following:- JMX
-
Invoke the
disconnectSourceoperation and specify thehotrodparameter on theRollingUpgradeManagerMBean. - CLI
-
$ bin/ispn-cli.sh --connect controller=127.0.0.1:9990 -c "/subsystem=datagrid-infinispan/cache-container=clustered/distributed-cache=MyCache:disconnect-source(migrator-name=hotrod)"
-
Decommission the source cluster.
5. Scripting
5.1. Scripting
Scripting is a feature of Infinispan Server which allows invoking server-side scripts from remote clients. Scripting leverages the JDK’s javax.script ScriptEngines, therefore allowing the use of any JVM languages which offer one. By default, the JDK comes with Nashorn, a ScriptEngine capable of running JavaScript.
5.2. Installing Scripts
Scripts are stored in a special script cache, named '___script_cache'. Adding a script is therefore as simple as put+ting it into the cache itself. If the name of the script contains a filename extension, e.g. +myscript.js, then that extension determines the engine that will be used to execute it. Alternatively the script engine can be selected using script metadata (see below). Be aware that, when security is enabled, access to the script cache via the remote protocols requires that the user belongs to the '___script_manager' role.
5.2.1. Script Metadata
Script metadata is additional information about the script that the user can provide to the server to affect how a script is executed. It is contained in a specially-formatted comment on the first lines of the script.
Script Metadata Comments
Properties are specified as key=value pairs, separated by commas.
You can use several different comment styles: The //, ;;, # depending on the scripting language you use.
You can split metadata over multiple lines if necessary, and you can use single (') or double (") quotes to delimit your values.
The following are examples of valid metadata comments:
// name=test, language=javascript
// mode=local, parameters=[a,b,c]
Metadata Properties
The following metadata property keys are available
-
mode: defines the mode of execution of a script. Can be one of the following values:
-
local: the script will be executed only by the node handling the request. The script itself however can invoke clustered operations
-
distributed: runs the script using the Distributed Executor Service
-
-
language: defines the script engine that will be used to execute the script, e.g. Javascript
-
extension: an alternative method of specifying the script engine that will be used to execute the script, e.g. js
-
role: a specific role which is required to execute the script
-
parameters: an array of valid parameter names for this script. Invocations which specify parameter names not included in this list will cause an exception.
-
datatype: optional property providing information, in the form of Media Types (also known as MIME) about the type of the data stored in the caches, as well as parameter and return values. Currently it only accepts a single value which is
text/plain; charset=utf-8, indicating that data is String UTF-8 format. This metadata parameter is designed for remote clients that only support a particular type of data, making it easy for them to retrieve, store and work with parameters.
Since the execution mode is a characteristic of the script, nothing special needs to be done on the client to invoke scripts in different modes.
Script Bindings
The script engine within Infinispan exposes several internal objects as bindings in the scope of the script execution. These are:
-
cache: the cache against which the script is being executed
-
marshaller: the marshaller to use for marshalling/unmarshalling data to the cache
-
cacheManager: the cacheManager for the cache
-
scriptingManager: the instance of the script manager which is being used to run the script. This can be used to run other scripts from a script.
Script Parameters
Aside from the standard bindings described above, when a script is executed it can be passed a set of named parameters which also appear as bindings. Parameters are passed as name,value pairs where name is a string and value can be any value that is understood by the marshaller in use.
The following is an example of a JavaScript script which takes two parameters, multiplicand and multiplier and multiplies them. Because the last operation is an expression evaluation, its result is returned to the invoker.
// mode=local,language=javascript
multiplicand * multiplier
To store the script in the script cache, use the following Hot Rod code:
RemoteCache<String, String> scriptCache = cacheManager.getCache("___script_cache");
scriptCache.put("multiplication.js",
  "// mode=local,language=javascript\n" +
  "multiplicand * multiplier\n");
5.3. Running Scripts with the Hot Rod Java Client
The following example shows how to invoke the above script by passing two named parameters.
RemoteCache<String, Integer> cache = cacheManager.getCache();
// Create the parameters for script execution
Map<String, Object> params = new HashMap<>();
params.put("multiplicand", 10);
params.put("multiplier", 20);
// Run the script on the server, passing in the parameters
Object result = cache.execute("multiplication.js", params);6. Monitoring Server Health
6.1. Health Monitoring
Infinispan server has special endpoints for monitoring cluster health. The API is exposed via:
-
Programmatically (using
embeddedCacheManager.getHealth()) -
JMX
-
CLI
-
REST (using WildFly HTTP Management API)
6.2. Accessing Health API using JMX
At first you need to connect to the Infinispan Server using JMX (use JConsole or other tool for this).
Next, navigate to object name jboss.datagrid-infinispan:type=CacheManager,name="clustered",component=CacheContainerHealth.
6.3. Accessing Health API using CLI
You can access the Health API from the Command Line Interface (CLI), as in the following examples:
- Standalone
-
$ bin/ispn-cli.sh -c "/subsystem=datagrid-infinispan/cache-container=clustered/health=HEALTH:read-resource(include-runtime=true)" - Domain Mode
-
$ bin/ispn-cli.sh -c "/host=master/server=${servername}/subsystem=datagrid-infinispan/cache-container=clustered/health=HEALTH:read-resource(include-runtime=true)"Where
${servername}is the name of the Infinispan server instance.
The following is a sample result for the CLI invocation:
{
    "outcome" => "success",
    "result" => {
        "cache-health" => "HEALTHY",
        "cluster-health" => ["test"],
        "cluster-name" => "clustered",
        "free-memory" => 99958L,
        "log-tail" => [
            "<time_stamp> INFO  [org.infinispan.server.endpoint] (MSC service thread 1-5) DGENDPT10001: HotRodServer listening on 127.0.0.1:11222",
            "<time_stamp> INFO  [org.infinispan.server.endpoint] (MSC service thread 1-1) DGENDPT10001: MemcachedServer listening on 127.0.0.1:11211",
            "<time_stamp> INFO  [org.jboss.as.clustering.infinispan] (MSC service thread 1-6) DGISPN0001: Started ___protobuf_metadata cache from clustered container",
            "<time_stamp> INFO  [org.jboss.as.clustering.infinispan] (MSC service thread 1-6) DGISPN0001: Started ___script_cache cache from clustered container",
            "<time_stamp> INFO  [org.jboss.as.clustering.infinispan] (MSC service thread 1-5) DGISPN0001: Started ___hotRodTopologyCache cache from clustered container",
            "<time_stamp> INFO  [org.infinispan.rest.NettyRestServer] (MSC service thread 1-6) ISPN012003: REST server starting, listening on 127.0.0.1:8080",
            "<time_stamp> INFO  [org.infinispan.server.endpoint] (MSC service thread 1-6) DGENDPT10002: REST mapped to /rest",
            "<time_stamp> INFO  [org.jboss.as] (Controller Boot Thread) WFLYSRV0060: Http management interface listening on http://127.0.0.1:9990/management",
            "<time_stamp> INFO  [org.jboss.as] (Controller Boot Thread) WFLYSRV0051: Admin console listening on http://127.0.0.1:9990",
            "<time_stamp> INFO  [org.jboss.as] (Controller Boot Thread) WFLYSRV0025: Infinispan Server <build_version> (WildFly Core <build_version>) started in 8681ms - Started 196 of 237 services (121 services are lazy, passive or on-demand)"
        ],
        "number-of-cpus" => 8,
        "number-of-nodes" => 1,
        "total-memory" => 235520L
    }
}
6.4. Accessing Health API using REST
The REST interface lets you access the same set of resources as the CLI. However, the HTTP Management API requires authentication so you must first add credentials with the add-user.sh script.
After you set up credentials, access the Health API via REST as in the following examples:
- Standalone
-
$ curl --digest -L -D - "http://localhost:9990/management/subsystem/datagrid-infinispan/cache-container/clustered/health/HEALTH?operation=resource&include-runtime=true&json.pretty=1" --header "Content-Type: application/json" -u username:password - Domain Mode
-
$ curl --digest -L -D - "http://localhost:9990/management/host/master/server/${servername}/subsystem/datagrid-infinispan/cache-container/clustered/health/HEALTH?operation=resource&include-runtime=true&json.pretty=1" --header "Content-Type: application/json" -u username:passwordWhere
${servername}is the name of the Infinispan server instance.
The following is a sample result for the REST invocation:
HTTP/1.1 200 OK
Connection: keep-alive
Authentication-Info: nextnonce="AuZzFxz7uC4NMTQ3MDgyNTU1NTQ3OCfIJBHXVpPHPBdzGUy7Qts=",qop="auth",rspauth="b518c3170e627bd732055c382ce5d970",cnonce="NGViOWM0NDY5OGJmNjY0MjcyOWE4NDkyZDU3YzNhYjY=",nc=00000001
Content-Type: application/json; charset=utf-8
Content-Length: 1927
Date: <time_stamp>

{
    "cache-health" : "HEALTHY",
    "cluster-health" : ["test", "HEALTHY"],
    "cluster-name" : "clustered",
    "free-memory" : 96778,
    "log-tail" : [
        "<time_stamp> INFO  [org.infinispan.server.endpoint] (MSC service thread 1-5) DGENDPT10001: HotRodServer listening on 127.0.0.1:11222",
        "<time_stamp> INFO  [org.infinispan.server.endpoint] (MSC service thread 1-1) DGENDPT10001: MemcachedServer listening on 127.0.0.1:11211",
        "<time_stamp> INFO  [org.jboss.as.clustering.infinispan] (MSC service thread 1-6) DGISPN0001: Started ___protobuf_metadata cache from clustered container",
        "<time_stamp> INFO  [org.jboss.as.clustering.infinispan] (MSC service thread 1-6) DGISPN0001: Started ___script_cache cache from clustered container",
        "<time_stamp> INFO  [org.jboss.as.clustering.infinispan] (MSC service thread 1-5) DGISPN0001: Started ___hotRodTopologyCache cache from clustered container",
        "<time_stamp> INFO  [org.infinispan.rest.NettyRestServer] (MSC service thread 1-6) ISPN012003: REST server starting, listening on 127.0.0.1:8080",
        "<time_stamp> INFO  [org.infinispan.server.endpoint] (MSC service thread 1-6) DGENDPT10002: REST mapped to /rest",
        "<time_stamp> INFO  [org.jboss.as] (Controller Boot Thread) WFLYSRV0060: Http management interface listening on http://127.0.0.1:9990/management",
        "<time_stamp> INFO  [org.jboss.as] (Controller Boot Thread) WFLYSRV0051: Admin console listening on http://127.0.0.1:9990",
        "<time_stamp> INFO  [org.jboss.as] (Controller Boot Thread) WFLYSRV0025: Infinispan Server <build_version> (WildFly Core <build_version>) started in 8681ms - Started 196 of 237 services (121 services are lazy, passive or on-demand)"
    ],
    "number-of-cpus" : 8,
    "number-of-nodes" : 1,
    "total-memory" : 235520
}%
7. Multitenancy
7.1. Multi-tenancy
Multi-tenancy allows accessing multiple containers as shown below:
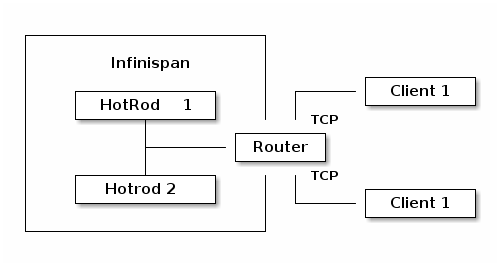
Currently there are two supported protocols for accessing the data - using Hot Rod client and using REST interface.
7.2. Multi-tenancy with REST
Multi-tenancy router uses URL prefixes to separate containers using the following template: https://<server_ip>:<server_port>/rest/<rest_connector_name>/<cache_name>/<key>;. All HTTP operations remain exactly the same as using standard rest-connector.
The REST connector by default support both HTTP/1.1 and HTTP/2 protocols. The switching from HTTP/1.1 to HTTP/2 procedure involves either using TLS/ALPN negotiation or HTTP/1.1 upgrade procedure. The former requires proper encryption to be enabled. The latter is always enabled.
7.3. Multi-tenancy with Hot Rod
Multi-tenant routing for binary protocols requires using a standard, transport layer mechanism such as SSL/TLS Server Name Indication. The server needs to be configured to support encryption and additional SNI routing needs to be added to the router-connector.
In order to connect to a secured Hot Rod server, the client needs to use configuration similar to this:
ConfigurationBuilder clientBuilder = new ConfigurationBuilder();
clientBuilder
    .addServer()
        .host("127.0.0.1")
        .port(hotrodServer.getPort())
     .security()
        .ssl()
           .enabled(sslClient)
           .sniHostName("hotrod-1") // SNI Host Name
           .trustStoreFileName("truststore.jks")
           .trustStorePassword("secret".toCharArray());
remoteCacheManager = new RemoteCacheManager(clientBuilder.build());
7.4. Multi-tenant router
The Multi-tenant router endpoint works as a facade for one or more REST/Hot Rod connectors. Its main purpose is to forward client requests into proper container.
In order to properly configure the routing, socket-binding attributes of other connectors must be disabled and additional attribute name must be used as shown below:
<rest-connector name="rest-1" cache-container="local"/>
<rest-connector name="rest-2" cache-container="local"/>
<hotrod-connector name="hotrod-1" cache-container="local" />
<hotrod-connector name="hotrod-2" cache-container="local" />
The next step is to add a new router-connector endpoint and configure how other containers will be accessed. Note that Hot Rod connectors require using TLS/SNI and REST connectors require using prefix in the URL:
<router-connector hotrod-socket-binding="hotrod" rest-socket-binding="rest" keep-alive="true" tcp-nodelay="false" receive-buffer-size="1024" send-buffer-size="1024">
    <hotrod name="hotrod-1" >
        <sni host-name="hotrod-1" security-realm="SSLRealm1"/>
    </hotrod>
    <hotrod name="hotrod-2" >
        <sni host-name="hotrod-2" security-realm="SSLRealm2"/>
    </hotrod>
    <rest name="rest-1">
        <prefix path="rest-1" />
    </rest>
    <rest name="rest-2">
        <prefix path="rest-2" />
    </rest>
</router-connector>
With the following configuration, Hot Rod clients will access hotrod-1 connector when using SNI Host Name "hotrod-1".
REST clients will need to use the following URL to access "rest-1" connector - https://<server_ip>:<server_port>/rest/rest-1.
8. Single Port
Single-Port is a special type of router connector which allows exposing multiple protocols over the same TCP port. This approach is very convenient because it reduces the number of ports required by a server, with advantages in security, configuration and management. Protocol switching is handled in three ways:
-
HTTP/1.1 Upgrade header: initiate an HTTP/1.1 connection and send an
Upgrade: protocolheader where protocol is the name assigned to the desired endpoint. -
TLS/ALPN: protocol selection is performed based on the SNI specified by the client.
-
Hot Rod header detection: if a Hot Rod endpoint is present in the router configuration, then any attempt to send a Hot Rod header will be detected and the protocol will be switched automatically.
|
The initial implementation supports only HTTP/1.1, HTTP/2 and Hot Rod protocols. The Memcached protocol is not supported. |
8.1. Single-Port router
Internally, Single-Port is based on the same router component used to enable multi-tenancy, and therefore it shares the same configuration.
<!-- TLS/ALPN negotiation -->
<router-connector name="router-ssl" single-port-socket-binding="rest-ssl">
    <single-port security-realm="SSLRealm1">
        <hotrod name="hotrod" />
        <rest name="rest" />
    </single-port>
</router-connector>
<!-- HTTP 1.1/Upgrade procedure -->
<router-connector name="router" single-port-socket-binding="rest">
    <single-port>
        <hotrod name="hotrod" />
        <rest name="rest" />
    </single-port>
</router-connector>
With the configuration above, the Single-Port Router will operate on rest and rest-ssl socket
bindings. The router named router should typically operate on port 8080 and will use HTTP/1.1 Upgrade
(also known as cleartext upgrade) procedure. The other router instance (called router-ssl) should typically
operate on port 8443 and will use TLS/ALPN.
8.1.1. Testing the Single-Port router
A tool such as curl can be used to access cache using both cleartext upgrade or TLS/ALPN. Here’s an example:
$ curl -v -k --http2-prior-knowledge https://127.0.0.1:8443/rest/default/testThe --http2-prior-knowledge can be exchanged with --http2 switch allowing to control how the switch procedure
is being done (via Plain-Text Upgrade or TLS/ALPN).
8.2. Hot Rod Protocol Detection
The single-port router has built-in automatic detection of Hot Rod messages which trigger a transparent "upgrade" to the Hot Rod protocol. This means that no changes are required on the client side to connect to a single-port endpoint. It also means that older clients will also be able to function seamlessly.
8.2.1. TLS/ALPN protocol selection
Another supported way to select the protocol is to use TLS/ALPN which uses the Application-Layer Protocol Negotiation spec. This feature requires that you have configured your endpoint to enable TLS.
Enabling ALPN
If you are using JDK 9 or greater, ALPN is supported by default. However, if you are using JDK 8, you will need to use Netty’s BoringSSL library, which leverages native libraries to enable ALPN.
-
Add Netty dependencies.
<dependencyManagement> <dependency> <groupId>io.netty</groupId> <artifactId>netty-bom</artifactId> <!-- Pulled from Infinispan BOM --> <version>${version.netty}</version> <type>pom</type> <scope>import</scope> </dependency> </dependencies> </dependencyManagement> <dependency> <groupId>io.netty</groupId> <artifactId>netty-tcnative-boringssl-static</artifactId> <!-- The version is defined in Netty BOM --> </dependency> -
Configure your trust store accordingly:
ConfigurationBuilder builder = new ConfigurationBuilder()
      .addServers("127.0.0.1:8443");

builder.security().ssl().enable()
      .trustStoreFileName("truststore.pkcs12")
      .trustStorePassword(DEFAULT_TRUSTSTORE_PASSWORD.toCharArray());

RemoteCacheManager remoteCacheManager = new RemoteCacheManager(builder.build());
RemoteCache<String, String> cache = remoteCacheManager.getCache("default"");